Last year I wrote a blog post detailing my photography workflow. Since last year though my workflow has changed a bit as I’ve migrated from Adobe’s Bridge software to Adobe’s Lightroom software and thought that I’d post an updated article detailing how I process my images from start to finish. Questions about my workflow are some of the most common questions I’m regularly asked.
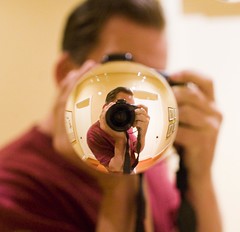 1. Step One. Capture the Image. My current tools that I use to capture images include a Canon 5D Mark II camera and the following Canon lenses that I carry with me 24 hours a day / 7 days a week: 135mm f/2, 24mm f/1.4, 50 mm f/1.2, 14mm f/2.8, 100mm macro f/2.8. In addition to these five lenses I also carry with me my MacBook Pro, a high speed card reader, a back up 5D M2 battery and battery charger and three CF cards (a 16GB and 2 8GB, all SanDisk). I also carry daily with me Moo cards that I can hand out to people that I meet to point them to my photography.
On longer photo outings or weekend trips I will also bring with me a 120GB USB powered Maxtor hard drive, my Manfrotto tripod, my Canon cable release and usually my backup camera body, a Canon 5D.
I shoot every day. I try to take advantage of every minute I can to shoot. Sometimes this is 10 minutes of walking on my way to my office. Other times it’s 2 hour photowalks after work. Other times it’s an hour photowalk during a lunch break. Frequently it also involves more serious outings including out of town weekends to new destinations to shoot.
My iPhone also always goes with me and I especially use the mapping features on the phone to find and shoot new locations.
I use Flickr, Zooomr and Google Maps to constantly research things that I want to shoot. Neon signs, graffiti, landmarks, unique settings, etc. I have several local maps as well as maps for almost every state in the U.S. of things that I want to shoot there. Prior to going out on a shoot I’ll frequently assemble a list of the locations that I want to shoot and structure the order so that I can most efficiently drive or walk to various locations that I’d like to shoot. I use my iPhone to help get me around in places where I’m not 100% familiar with the area.
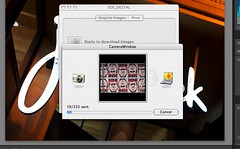 2. Step Two. Transfer the images to the computer. Most days my 32GB of CF storage is sufficient. For longer and more detailed shoots I’ll take breaks from shooting to manually transfer images from my cards to my MacBook Pro, freeing up the memory card for more shooting. Some days I’ll shoot as many as 2,000 frames which means a number of transfers from my cards (I always shoot in full quality RAW format) to my MacBook. Other days I may just have a few hundred frames to transfer. Pretty much daily though I’m transferring images from my cards to my computer. If you take a lot of photos like I do, do yourself a favor and invest in a high speed card reader. I use Canon’s proprietary software, Camera Window, to transfer my images to my computer. This software organizes my images into folders by date.
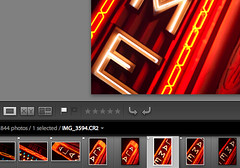 3. Step Three. Flag Images. My next step is to use Adobe Lightroom 2.3 to look at a day’s images. Here I go through a culling process where I use the flag tool to flag all of the images that I’d potentially like to process.
I don’t always end up processing 100% of what I flag, but mostly I’ll process these.
In general I’d say that I probably flag about 5-15% of the frames that I shoot.
 4. Step Four. Develop images. Once the images for a day’s shoot are flagged I’ll use Lightroom’s “Develop” mode to make non-destructive adjustments to my RAW files in Lightroom. Typically I will alter the contrast, exposure, color temperature, brightness, fill lightening, blacks, clarity, vibrance and saturation. I’ll also use the vignette controls to create the optimal vignette (or reduce or eliminate natural vignette if need be). I’ll also use the spot removal tool to remove blemishes or dust from photos. I’ll burn and dodge typically as needed as well. This might sound like a lot of activity, but it actually happens very quickly. I’m trying to publish one million photos before I die, so I simply do not have time to spend a great deal of time on any single photo. Most photos are processed in 60 seconds or less.
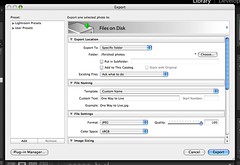 5. Step Five. Export JPG file. Once I’ve developed a photograph I’ll export a JPG version of it into a “finished photos” folder on my hard drive. I use the highest quality JPGs possible.
I also use this “finished photos” folder as my screensaver on my Mac. That way I can periodically see the most recent photos I’m working on as well as see any small blemishes big screen that I might have missed in the initial processing.
Sometimes I’ll go back in Photoshop and fix small blemishes or other things that I notice need work on my images during the day that they are playing in my screensaver on my Mac.
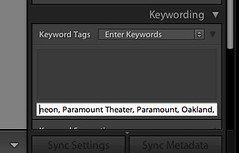 6. Step Six. Keywording. When I’m done processing a day’s photos, I’ll return to the library mode of Lightroom and synchronize the “finished photos” folder with Lightroom and begin keywording these images. I’ll almost always include the state and city an image is taken in, any reference to a particular organized photowalk or event or outing, and details to describe as best I can this image in keywords.
Keywords are very important for indexing your images for search on the internet and I could probably write a whole article about keywording alone. The key is to be as descriptive as possible and use any possible term that someone might use to search for the photo. If I take a photo of a painting at the Norton Simon Museum in Pasadena, for instance, it would likely be keyworded with “Norton Simon,” “Norton Simon Museum,” “museum,” “painting,” “Pasadena,” “California,” “Los Angeles,” as well as keywords of the artist, painting title, and anything in the painting itself “cow,” “farm,” “moon,” etc.
 7. Step Seven. Geotagging. Once all of my images for a day are keyworded I’ll use Geotagger on the Mac to drag and drop my images using Google Earth in order to geotag them. If you are using a PC, Microsoft also has a free geotagging and keywording tool at their Pro Photo Tools page.
Geotagging my images at the file level (like keywording) means that I don’t have to geotag them on either Flickr or Zooomr. It ensures that I always retain this important data with my images both for search on my own computers as well as for search online.
 8. Step Eight. Archiving. Once a days photos are done, I will transfer the day’s RAW file folder onto my PC and on to a Drobo. I like to use Drobos because my images are then replicated across multiple drives protecting me in the event of a single drive failure.
I presently have four Drobos with about 10 terrabytes of storage. I will then take my finished JPG files and divide them into two categories “A” photos and “B” photos. I have another folder for A and B finished JPG files on one of my Drobos. At present I probably have about 20,000 finished photos that have not yet been published to the internet. About 20% of my finished photos end up in the “A” folder and 80% end up in the “B” folder.
I also periodically make sure that other copies of my finished photos are archived on hard drives off-site in case of theft or fire at my house.
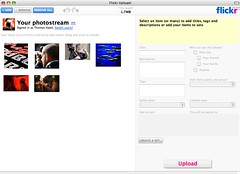 9. Step Nine. Publishing. Typically I publish photos online 2x a day on weekdays and 3x a day on weekends. I will always select 5 of my “A” quality photos to upload in each batch. I will also include 12-17 “B” quality photos. I arrange my photos so that my “A” photos are the last 5 that I upload, with the photo that I like the very best from that batch being the very last photo that I upload.
Because Flickr and Zooomr typically favor your last 5 photos when sharing with your contacts, this ensures that most of my contacts will see my better images. Although I select 5 “A” photos and 12-17 “B” photos, there usually is no rhyme or reason to which photos are selected and this is largely a random process pulling from my archives. The only exception to this is when I shoot something that is timely like a party or an event in which case I’ll try to upload some of those photos as soon after the event as possible.
And that’s pretty much about it. I wrote this post by the way in response to a thread about other people’s workflow in the Deleteme Uncensored group where I am active on Flickr. You can read that thread here to see how other people manage their photos online.
Do you use a mouse, trackball, touchpad, or writing tablet for your photo editing?
Thomas, thanks for this. Interesting to see how others do it. I’m just switching to Lightroom from Photoshop.
Great stuff as always. Your original workflow was one of the first things I read when I was getting serious about my photos. I also enjoyed the series of photowalk videos you did with Robert a few years ago.
Thanks Thomas. I borrowed your workflow from last year and like you have adapted it to Lightroom. I am curious though, why you do some general keywording on all of your RAW images? I di the keywording on everything and then if I want to be more specific I’ll keyword the JPEGs. I don’t think I keyword as much as you do (nor do I take nearly that many photos a day) however, so maybe that is why.
Oh, also… I don’t have an HC SD card reader on my editing computer so I import directly from my camera and have Lightroom create the folders for me on import.
Yikes, sorry. I just went back and re-read my initial comment. I have too many typos. I meant, why *don’t* you do some general keywording on all of your RAW images?
I’m curious as to why you don’t use Lightroom’s import feature?
Once you’ve Published your “A” and “B” photos, was measures do you take to ensure you don’t publish those again? Do you delete / rename / move to another folder?
David, I mostly use a mouse or the touchpad on my MacBook Pro.
Kenton, I don’t keyword in RAW because it’s too much work. It takes too much time to both process the keywords on so many photos as well as there is too much specific keywording unique to single images that I’m not interested in doing if I’m not going to publish the photo. I suppose I could do some mass general keywording there (like if I shot a museum I could first keyword all the RAW files with the museum name, city, state, etc.) but I don’t really see the point. If I can find the JPG file either locally or on Flickr/Zooomr, I can easily see the date it was taken from the metadata and go back to that folder if I really need to find something.
Keywording is my least favorite chore, so I’d be hesitant to do any more of it than I already do.
Good question Jason. Yes, once I publish photos, I remove them from the A and B folders and put them into folders by month/year of published photos. This ensures that I don’t duplicate uploads.
Eugene I don’t use Lightroom’s import function mostly because Canon’s software seems to do a fine job at it and I like the way it organizes my photos by date. I’m sure Lightroom probably can do the same thing, but the Canon software is very light and easy to use and has been pretty much error free for me. It works for me and is free software that comes with Canon cameras so I haven’t had any compelling reason not to use it.
Thomas, thanks for the update on your process – sounds similar to mine aside from the carrying camera around 24/7 and backing up.
Jason, those are two of the most important things though. 😉
Very interesting. Thanks for sharing. Also, when do you find time to favorite and comment on other photos on Flickr, etc? Sounds like your day is pretty full!
bri, Flickr, Zooomr, and FriendFeed are daily activities for me where I can find and fave/comment on others’ photography. I’m also pretty active in the DMU critique group linked above where I typically post one photo a day to go through a critique process by peers.
I try to push in as much as I can in my day, but frankly, I often end up short. Fortunately I’ve got an understanding wife and family who live with my trying to squeeze so much into a single day. Frequently I’m over worked and stressed out, but I have fairly ambitious goals with regards to my work.
Consuming the photography of others is important for several reasons. Frequently I find it inspiring. I also find that I get lots of ideas both for subjects and styles to experiment with by watching what others are up to. I rely heavily on both Flickr and Zooomr for research on a number of my projects.
Thanks, Thomas, for the reply. I have had a similar experience with interacting with other photos in Flickr. Some very impressive stuff that I have learned so much from. But for me, as for so many others, I think, the limiting factor is time. Photography has become an obsession in recent years, but it currently is not an obsession that I make a living from.
Have you really got a fulltime job with 40h/week? I almost cannot believe that you are shooting so many high-class images, making photography tours and everything else AND you have got a real job. How is that possible?
As usual, interessting and inspiring post. Thanks Thomas.
I tend to have a similar workflow, but “all in one” in Lightroom: from import to the HDD to export to Flickr (thanks to the excellent Jeffrey Friedl plugin).
Lightroom import function can create the year/month/day hierarchy.
Then I browse my photos and use the color label for each step of the workflow:
Red = candidate for publishing
Yellow = processing done
green = metadata entered (at least title, location + some keywords & when I can GPS coordinates)
Blue = published
purple = reviewed but not selected for publishing
I very much like the idea of having a “buffer” of several photos in each step, so they can mature (sometimes slowly) to the final stage for publishing.
One of the reason I like Lightroom as well is precisely for the ability to to everything with only one app…
regards
Guillaume
Thanks for sharing your workflow, always good information from you Thomas. Do you feel Geo-Tagging is really important for searches, etc? I wonder if this will be a way people continually search for images in the future, rather than with simple text searches?
I wrote a small article a few months ago about my online photo work flow. Not as in-depth as yours, but it’s a little information.
Thanks again!
Isn’t the rating/tagging system in Lightroom brilliant? I do something similar but using a combination of 1-5 stars and colours.
Similar to Guillaume above I use colours to indicate what I’m going to do with it – Red is part of a Panoramic / HDR blend; Green needs further Photoshop work; Purple will be posted to my blog, etc.
I also rate every photo between 1-5 stars from 1* = Rubbish to 4* = Send to Client and 5* = Print and Frame it.
I also use the Flagging in a similar way to Thomas’ “A” and “B” picks to then separate the best of the starred images, i.e Flagged 4* are the best of the client’s images, etc.
Yes, this all takes time but you end up with a much cleaner and higher quality subset of photos when with digital you typically end up taking SOOO many photos.
Same here as Guillaume. Interesting how we arrive at similar workflows. What I find most annoying is the import from card using LR (already discussed above) so I’ll try going back to Canon’s, but I’m not sure I trust LR to find all the images in the folders if it didn’t import them. I also made a choice over a year ago to convert all RAW to DNG for the fact that I can view the thumbs natively in Vista and don’t worry about future compatibility.
Actually scratch that… the most annoying HAS TO BE keywording. Comfort to see that you suffer this too Thomas! Adobe really needs to make a keyboard shortcut for keywording that works in the develop module.
Thanks for sharing!
I’ve become a Lightroom convert during the last year. Now that Nik’s filter software works as a plug in for Lightroom, I use Photoshop even less.
It’s of no use to you I suspect, having read how you organise your workflow, but Jeffrey Friedl’s Lightroom plug in for direct export to Flickr is an awesome time saver.
Btw, is there not a way to receive updates to the comments of this post? If not, I should perhaps have gone via Friendfeed 🙂
Thanks Thomas. Great workflow. I use something very close with the exception of geotagging, which I’ll now add in to the mix. Would love to see a “whole article about keywording alone.” Thanks again for sharing.
Interesting to see that you shoot with prime lenses exclusively, and none over 135 mm! Considering your frequent tight framed photos, I’m guessing you do a lot of zooming with your legs 😉
Hi Thomas,
what is written on your moo-cards, which you give the people, you took a photo.
Your whole address or only email and web-address fpr contacting you and downloading the picture?
Whats about publishing of your street photos?
colmans
Hi Thomas, me again,
what’s about traveling by plane with your equiment.
I use the same Loewepro CompuDayPack as you for years. On business travel it contains only a Nikon D200, a Nikkor 18-200 mm, MacBookPro 17″, chargers and batteries � much less than yours!
But it is, of course, too heavy�
colmans
Oh man, I was hoping you’d rewrite last year’s article just the other day! I took a lot of input from your last article in trying to figure out what the heck I was doing when I got my 20D and planned on shooting in RAW, and figuring out how to organize it… This is again a great resource in building a solid workflow. 😀
Very nice write-up. I’d hate to carry that load 24/7 on my back, but I can appreciate your passion. My own workflow is similar. I never made the switch from Aperture to Lightroom. Although there are features in Lightroom that look appealing, they aren’t important enough to me to justify the switch.
One thing I recently purchased was the Nikon GP-1 GPS. I love automatic geotagging! I’m not sure if Canon has a similar product, but you may want to look into a 3rd party tool to save yourself a bit of time. For me, it was money well-spent.
Very helpful – and interesting! Thank you.
Colmans, I take my Lowepro backpack with me on all flights. I pack very light and in addition to that backpack typically only bring one other small bag with clothes. This way I don’t have to check luggage and can get in and out of the airport faster. I can’t imagine ever checking any of my camera gear. Would not want it that far away from me ever.
In terms of my Moo cards, I list my blog, cell phone number, email address as well as links to my flickr, zooomr, friendfeed and twitter accounts. I use the larger full-sized moo cards which are a little more expensive but which look *amazing*!
Interesting reading. Thank you. My workflow is very similar to yours, but I’m geotagging and keywording my DNG files. I want all that important information in my digital negatives.
I have been “reading” your blog for months now and this is the first one that got me hooked. Thank you! You have inspired me to change my process and take more pictures. I have moved your blog in my reader and you will be first every morning! Thanks again and I’ll see you tomorrow!
unless i missed it, step 9 should have mentioned use of appropriate LICENSE
Will you explain what you mean when you say “synchronize” here: “My Photography Workflow 2009, Plate 46. Step Six. Keywording. When I�m done processing a day�s photos, I�ll return to the library mode of Lightroom and synchronize the ‘finished photos’ folder with Lightroom and begin keywording these images.”
Thanks! Loved reading about your workflow.
Thank you very much for sharing this
Great article Thomas!
Considering the huge number of photos you take, do you delete the full sized RAW files of images that are not A or B? …otherwise you would start filling up your laptop/Drobos *very* quickly!!
Thanks again for sharing.
A few notes or oddities when comparing it with my own LR workflow:
– Why do you keyword only JPGs? Aren’t you archiving the RAW files too? If you keyword the RAW images then the exported image file will have the data in the exported file, too.
– You mentioned you add keywords such as �Pasadena,� �California,� — do you not use nested keywords? if you instead tagged as “Pasadena > California” next time in you could just type “Pasadena” and get both tags. This is great just not for places [eg, “park name” > “city” > “state” > “country”] but also things like animals or birds “male red-winged blackbird” > “red-winged blackbird” > “bird”] and means a lot less typing later. [you can also nest existing keywords with drag and drop]
Myself I want LR mostly to organize and archive my RAW images. So I use a similar workflow but I make sure that I geotag the RAW files before importing [sync with gps device] and keyword on import with high level tags and then add more specific keywords as I’m doing my picking and rejecting [your step 3]
Now everyone has their own way of doing things, so this isn’t a critique — i’m just curious why you’ve settled on the reverse workflow in some ways as I have.
i wonder why you use canon’s software to load your images to the computer when lightroom can do the same when importing, and can also arrange photos to folders by shooting date?
Doesn’t maintaining two copies of each “finished photo” in Lightroom sort of defeat the whole point of Lightroom’s core workflow? At first glance, one would expect a “Finished Photos” collection, not a separate export/import step. I’m sort of left scratching my head wondering whether I’m missing something.
What kind of file structure do you maintain on disk? That’s also a central core of any good workflow, and having the “wrong” structure (wrong for one’s workflow) becomes a thorn at most every step. Personally, I use a date-based structure like /photo/2009/05/12-Photowalk/. What do you use?
About geoencoding, if you have an external GPS unit (which you do, in your iPhone), it’s really quite easy to geoencode all the photos in one quick shot using my plugin, mentioned in a previous comment: http://regex.info/blog/lightroom-goodies/gps . I use a separate Garmin unit, and to geoencode the thousands of photos I took on a recent vacation took all of about 30 seconds: 1) take card from unit and insert into computer; 2) Issue a command that copies gpx files from card to computer; 3) in Lightroom, select all images and invoke “Geoencode”; 4) select the appropriate gpx files; 5) press start button. Done.
Once geencoded in Lightroom, you have the ability to visit the photo location on a dozen different mapping / photo sites, and with my proximity-search plugin, you can find other photos in your library taken in the same vicinity. Never having had the ability to do a proximity search, I suspect that most people don’t see much use for it when they do think about it, but experience has told me that once you’ve built up a critical mass of encoded images and start using it, you find all kinds of ways it helps you. Maybe I’m just geographically challenged, but I couldn’t tell you how many times it’s helped me connect the dots on locations that were physically close but separated in my mind by time or concept. I have a lot of photos about Japan on my blog, with a “nearby photos” link under each, allowing the reader to explore the area of a photo, seeing nearby places or even the same place in a different season. Proximity search is wonderful.
Finally, I’ll mention that I have a plugin for Lightroom for uploading to Flickr. Many find it really helps erase the hassle, allowing them to publish more of what they want. It sends them in the same order that you have them arranged when you invoke the export, so to have them appear at Flickr in a specific order, set the order you want then hit the A/Z toggle to reverse it, and upload.
Curious, and I apologize if you’ve answered this elsewhere: Why Lightroom vs. Aperture? Personally, I manage my gigs of images manually (gasp!) and simply use Camera Raw in Photoshop for my non-destructive edits.
Hi. Thanks for the work flow article. Pretty closeup detail. But got lost in to the file structure. I wish you’d draw the file tree structure so that i too could start arranging them. I do not have any definitive yet.
In terms of the DNG comments, I’ve also heard that they are significantly smaller than Cannon’s RAW files, without losing anything. That, and future-compatibility, has tempted me to switch.
I guess that from this post,they get a changeable for the benefits of a reader so that they can make it a habitual plan.
Very nice sharing with your Workflow as I am very new to photography.
Some inquiries:
1. Why is your choice of using Prime only?
2. Why Lightroom compared to Photoshop CS?
Thank you Mr Hawk . Is there too a newsletter here? Anyway , I would like to subscribe to your page and get it to my email address (sse above) regularly . Is that possible?
Gracias por compartirlo
?????? ??????? ??????? ???????, ?????? ???? ? ????????.
??? ??????, ?????? ????? ????????? ?????.
?????? ????? ????
Our Church would like to use one of your images to advertise for our Candlelight Service this year. Life Bible Church 21211 Coburg Rd. Harrisburg OR (physical address) 23781 Powerline Rd. Harrisburg, OR 97446
The image we would like to use is NO Vacancy 2893963392_3c37914766_z.jpg
Our theme is “No Vacancy” He is still looking for a room…” Wpuld you be willing to let us use your image?
Eilleen Knott
Office Asst.Life Bible Church
eilleen@lifebiblechurch.org
Great workflow, I never thought of geotagging but I think it’s a very smart idea especially with the vast amount of images we take as photographers. Thank you for the wonderful article.