Last year I wrote a blog post detailing my photography workflow. Since last year though my workflow has changed a bit as I’ve migrated from Adobe’s Bridge software to Adobe’s Lightroom software and thought that I’d post an updated article detailing how I process my images from start to finish. Questions about my workflow are some of the most common questions I’m regularly asked.
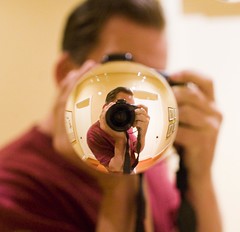 1. Step One. Capture the Image. My current tools that I use to capture images include a Canon 5D Mark II camera and the following Canon lenses that I carry with me 24 hours a day / 7 days a week: 135mm f/2, 24mm f/1.4, 50 mm f/1.2, 14mm f/2.8, 100mm macro f/2.8. In addition to these five lenses I also carry with me my MacBook Pro, a high speed card reader, a back up 5D M2 battery and battery charger and three CF cards (a 16GB and 2 8GB, all SanDisk). I also carry daily with me Moo cards that I can hand out to people that I meet to point them to my photography.
On longer photo outings or weekend trips I will also bring with me a 120GB USB powered Maxtor hard drive, my Manfrotto tripod, my Canon cable release and usually my backup camera body, a Canon 5D.
I shoot every day. I try to take advantage of every minute I can to shoot. Sometimes this is 10 minutes of walking on my way to my office. Other times it’s 2 hour photowalks after work. Other times it’s an hour photowalk during a lunch break. Frequently it also involves more serious outings including out of town weekends to new destinations to shoot.
My iPhone also always goes with me and I especially use the mapping features on the phone to find and shoot new locations.
I use Flickr, Zooomr and Google Maps to constantly research things that I want to shoot. Neon signs, graffiti, landmarks, unique settings, etc. I have several local maps as well as maps for almost every state in the U.S. of things that I want to shoot there. Prior to going out on a shoot I’ll frequently assemble a list of the locations that I want to shoot and structure the order so that I can most efficiently drive or walk to various locations that I’d like to shoot. I use my iPhone to help get me around in places where I’m not 100% familiar with the area.
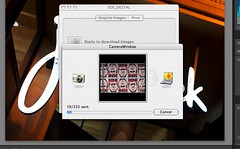 2. Step Two. Transfer the images to the computer. Most days my 32GB of CF storage is sufficient. For longer and more detailed shoots I’ll take breaks from shooting to manually transfer images from my cards to my MacBook Pro, freeing up the memory card for more shooting. Some days I’ll shoot as many as 2,000 frames which means a number of transfers from my cards (I always shoot in full quality RAW format) to my MacBook. Other days I may just have a few hundred frames to transfer. Pretty much daily though I’m transferring images from my cards to my computer. If you take a lot of photos like I do, do yourself a favor and invest in a high speed card reader. I use Canon’s proprietary software, Camera Window, to transfer my images to my computer. This software organizes my images into folders by date.
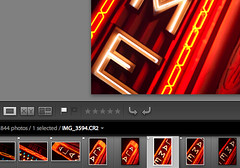 3. Step Three. Flag Images. My next step is to use Adobe Lightroom 2.3 to look at a day’s images. Here I go through a culling process where I use the flag tool to flag all of the images that I’d potentially like to process.
I don’t always end up processing 100% of what I flag, but mostly I’ll process these.
In general I’d say that I probably flag about 5-15% of the frames that I shoot.
 4. Step Four. Develop images. Once the images for a day’s shoot are flagged I’ll use Lightroom’s “Develop” mode to make non-destructive adjustments to my RAW files in Lightroom. Typically I will alter the contrast, exposure, color temperature, brightness, fill lightening, blacks, clarity, vibrance and saturation. I’ll also use the vignette controls to create the optimal vignette (or reduce or eliminate natural vignette if need be). I’ll also use the spot removal tool to remove blemishes or dust from photos. I’ll burn and dodge typically as needed as well. This might sound like a lot of activity, but it actually happens very quickly. I’m trying to publish one million photos before I die, so I simply do not have time to spend a great deal of time on any single photo. Most photos are processed in 60 seconds or less.
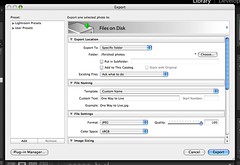 5. Step Five. Export JPG file. Once I’ve developed a photograph I’ll export a JPG version of it into a “finished photos” folder on my hard drive. I use the highest quality JPGs possible.
I also use this “finished photos” folder as my screensaver on my Mac. That way I can periodically see the most recent photos I’m working on as well as see any small blemishes big screen that I might have missed in the initial processing.
Sometimes I’ll go back in Photoshop and fix small blemishes or other things that I notice need work on my images during the day that they are playing in my screensaver on my Mac.
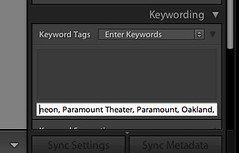 6. Step Six. Keywording. When I’m done processing a day’s photos, I’ll return to the library mode of Lightroom and synchronize the “finished photos” folder with Lightroom and begin keywording these images. I’ll almost always include the state and city an image is taken in, any reference to a particular organized photowalk or event or outing, and details to describe as best I can this image in keywords.
Keywords are very important for indexing your images for search on the internet and I could probably write a whole article about keywording alone. The key is to be as descriptive as possible and use any possible term that someone might use to search for the photo. If I take a photo of a painting at the Norton Simon Museum in Pasadena, for instance, it would likely be keyworded with “Norton Simon,” “Norton Simon Museum,” “museum,” “painting,” “Pasadena,” “California,” “Los Angeles,” as well as keywords of the artist, painting title, and anything in the painting itself “cow,” “farm,” “moon,” etc.
 7. Step Seven. Geotagging. Once all of my images for a day are keyworded I’ll use Geotagger on the Mac to drag and drop my images using Google Earth in order to geotag them. If you are using a PC, Microsoft also has a free geotagging and keywording tool at their Pro Photo Tools page.
Geotagging my images at the file level (like keywording) means that I don’t have to geotag them on either Flickr or Zooomr. It ensures that I always retain this important data with my images both for search on my own computers as well as for search online.
 8. Step Eight. Archiving. Once a days photos are done, I will transfer the day’s RAW file folder onto my PC and on to a Drobo. I like to use Drobos because my images are then replicated across multiple drives protecting me in the event of a single drive failure.
I presently have four Drobos with about 10 terrabytes of storage. I will then take my finished JPG files and divide them into two categories “A” photos and “B” photos. I have another folder for A and B finished JPG files on one of my Drobos. At present I probably have about 20,000 finished photos that have not yet been published to the internet. About 20% of my finished photos end up in the “A” folder and 80% end up in the “B” folder.
I also periodically make sure that other copies of my finished photos are archived on hard drives off-site in case of theft or fire at my house.
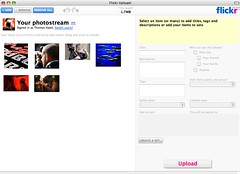 9. Step Nine. Publishing. Typically I publish photos online 2x a day on weekdays and 3x a day on weekends. I will always select 5 of my “A” quality photos to upload in each batch. I will also include 12-17 “B” quality photos. I arrange my photos so that my “A” photos are the last 5 that I upload, with the photo that I like the very best from that batch being the very last photo that I upload.
Because Flickr and Zooomr typically favor your last 5 photos when sharing with your contacts, this ensures that most of my contacts will see my better images. Although I select 5 “A” photos and 12-17 “B” photos, there usually is no rhyme or reason to which photos are selected and this is largely a random process pulling from my archives. The only exception to this is when I shoot something that is timely like a party or an event in which case I’ll try to upload some of those photos as soon after the event as possible.
And that’s pretty much about it. I wrote this post by the way in response to a thread about other people’s workflow in the Deleteme Uncensored group where I am active on Flickr. You can read that thread here to see how other people manage their photos online.