
Adobe’s Lightroom 2.0, which launched today represents a major breakthrough in the field of digital photo processing. I’ve only just begun to play with the software today, but it is clear that Lightroom 2.0 will be my new imaging software of choice. Prior to using Lightroom 2.0 I did my photo processing using Adobe’s Bridge and Photoshop. Lightroom represents a significant leap forward in the power of processing digital photographs. I thought I’d write up a post documenting my 10 new favorite processing tools that Lightroom 2.0 brings to the table.
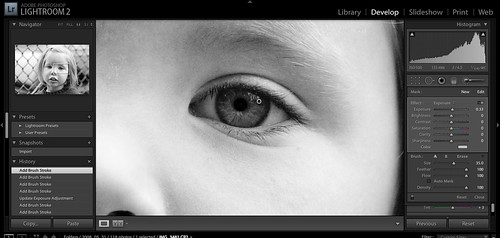
1. Selective area processing of files. When using Adobe’s Camera RAW to process in the past, an image was an all or none, take it or leave it, proposition. Yes, you could increase the exposure and contrast on a shot, but you had to increase the exposure and contrast for *the entire* shot. Frequently when processing photos you want more control than that. For example, sometimes you might have a shot perfectly exposed except for the eyes in a portrait which are too dark. With Lightroom 2.0 you can now control all of the basic RAW tools (exposure, brightness, contrast, saturation, clarity, sharpening and custom toning) using brushes or masks to highlight specific areas of a photo.
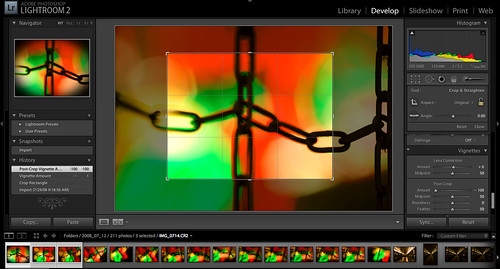
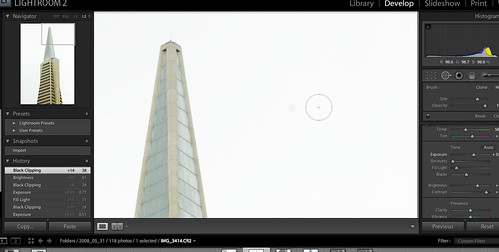
2. Vignette Cropped Photos. I’m a vignette junkie. Vignette is the area around the edge of your photos that is sometimes dark, sometimes light. A lot of vignetting occurs naturally in my Canon 5D — especially with the large sensor. Sometimes I like to process a photo perfectly and take this vignette out of my photograph. Other times though I like to add a varying amount of vignetting in or even reverse it out creating a more over exposed edge to my photograph. In the past Adobe Camera RAW could control vignette, but only for the image loaded. If you wanted to crop that image there was no way to control vignette for that specific crop. Now with Lightroom 2.0 you can apply a crop to an image and then adjust your vignetting control after the fact on the new crop.
There is also a new “roundness” slider for vignetting control which enables the ability to give your photos a more rough vignette look vs. a more even or controlled vignette alignment.
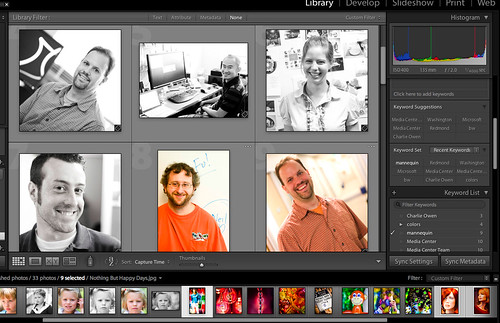
3. Keyword recommendations. One of the ways to make your photos more discoverable on sites like Flickr and Zooomr is to add tags or keywords to your photos. You might tag a photo of the Golden Gate Bridge for instance “Golden Gate Bridge” and “bridge” and “San Francisco” and “night” and “California” etc. But frequently there are tags that you don’t immediately think of. For instance, if you tag a photo of your dog “dog,” maybe the tag “black labrador” would be another good tag. And maybe another one might just be “black lab.” With Lightroom 2.0 Lightroom analyzes other tags that you have used with your photos to offer up suggested or recommended tags that you might use. Especially if you hope to offer your photos for sale through stock photography agencies, these descriptive keywords are very important meta data. By learning about your past tags, Lightroom is smarter and suggests tags that you might want to add to your photos as you tag and process them.
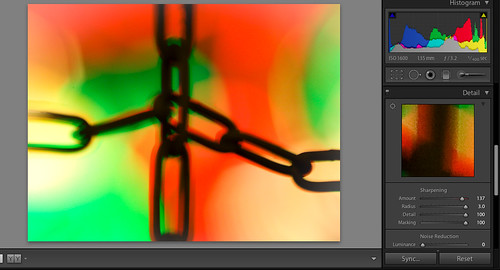
4. Better Photo Sharpening Tools. One of the nice things in Lightroom 2.0 is that you have much better tools for sharpening your photos than you did previously. I especially like the way that as you sharpen your photos (or parts of your photos) you can see a fine detail view of the sharpening work. This helps ensure that you don’t overdo your sharpening for high resolution views.
5. Healing Brush tools. One of the things that I hated about my old processing system was that I could not use a healing brush inside of Adobe Camera RAW. A healing brush is used to take out little imperfections in a photo. Large sensor digital cameras are notorious for getting dust spots on their sensors. You see these spots most visibly in your photographers when you are shooting at small (high number) aperture settings. These annoying little dust spots have ruined many a great photo. In the past I would need to manually bring these photos into Photoshop to use the healing brush to clean up these spots. Now this can be done within Lightroom itself. The healing brush approximates an area of the photo immediately near the spot that you’d like to heal and blends that area into the spot. This also works great when you have that perfect photograph of your kid with just a dab of peanut butter on his face.
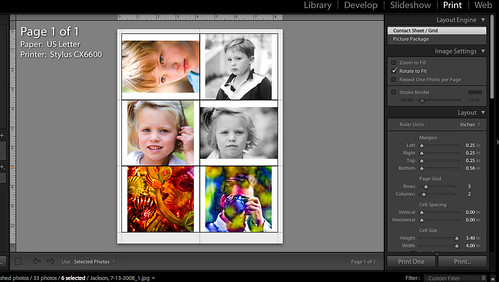
6. Enhanced Printing Tools. I love how Lightroom 2.0 handles printing your photos. With Lightroom 2.0 you can easily arrange multiple photos on a page with preset sizes. You can adjust the layout of the page into multiple columns or custom sizes for different photos. By providing enhanced layout options for printing, Lightroom allows you to use your printable photo paper space more intelligently and makes printing your photos at home easier than ever. I’ve got some large printing projects that I’m working on for a couple of collage pieces I’ve been meaning to do for a while and this tool will be very helpful when it comes time to print out a bunch of custom sized prints.

7. Support for custom camera color profiles and improved color photo processing from Adobe. One of the complaints that people have made about Adobe color processing in the past has to do with how it handles some colors. Specifically reds in photographs processed on Adobe’s software have sometimes lacked the big vibrancy that reds should have coming out a tad more orangish in some cases than reds. With Lightroom 2.0 Adobe has improved both their own color processing technology, but they have also added support for specific camera profiles. When you look at a photo on your camera’s LCD you are actually looking at a JPG interpretation of the photo that you just took. Frequently people will tell me that the colors that they see on their camera LCD are different than what they get when they take the photo home
and try to process it.
With Lightroom 2.0 you can use either Adobe’s new and improved color profiling system (which does a much better job at interpreting vivid reds) or you can tell Adobe to bypass their own color profiling system and use the actual color profiling system that is inside your camera.
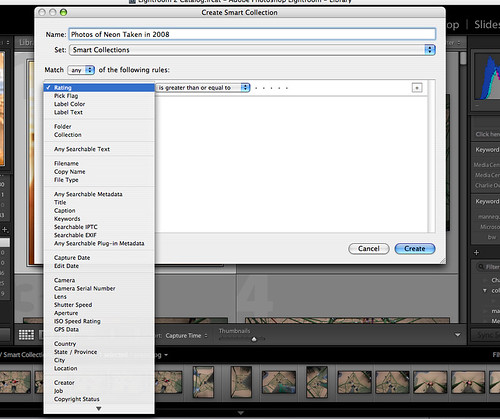
8. Smart Collections. Smart collections (like SmartSets on Zooomr and the SmartSetr application for Flickr) make sense. Frequently you will find yourself wanting to organize batches of your photos for various reasons. Lets say you want to see all photos of your daughter taken this year, or all photos of your daughter tagged with birthday, or a photo of all of your neon photographs taken in 2008. Whatever the case may be, you can build Smart Collections with Lightroom 2.0 to easily analyze and arrange your photos and allow you to better find and sort your work.
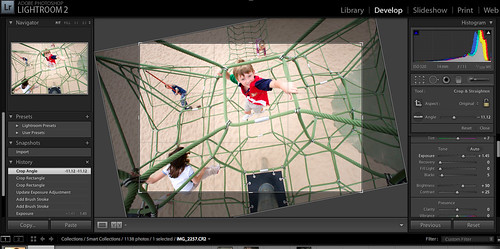
9. Smarter cropping and angling tools that show you a rotated view as you work. In the previous version of Bridge/Camera RAW that I used to process my photos, when you cropped an image and then rotated the crop you had to kind of turn your head sideways to visualize what you get. Now Lightroom 2.0 rotates the underlying image showing you a straightened version of what your new rotated and cropped photo will look like directly as you do this work.
10. Metadata SDK for custom metadata. The Metadata SDK that is being released with Lightroom is interesting. I’m not sure on any actual application for the SDK today but it is promising that by opening up this SDK to developers that there may be fantastic ways that we can use the metadata on our photographs in the future.
One of the things personally that I’d like to see develop over time would be a way that the social metadata that is added to your photographs can be reapplied to local copies. One of the nice things about online photo communities is that they encourage engagement with your photos. Many people on Flickr, for instance, have added additional tags and keywords to my photos online. At present there is no easy way to apply these added social tags to my existing photos. I’m hopeful that with Adobe’s new Metadata SDK that we might see some of these types of applications develop in the future.
I also think one of the first metadata enhancements that this SDK might make available would be some sort of geotagging add on.
There are lots of other enhancements to Lightroom 2.0 that I did not mention in this article. Probably the two biggest are that Lightroom can now support dual monitors and it can run natively in 64 bit on both Macs and PCs for added performance.
Adobe Lightroom retails for $299. Existing Lightroom users can upgrade for $99. You can download a free 30 day trial version of Lightroom 2.0 here.
Great write up, I think you made me drool a bit 🙂
Can’t wait to get my hands on this software!
Thomas, Glad to hear you finally converted to Lightroom! I've been using Lightroom for about 2 years, since it was Beta 1.0 and can't even imagine going back to the 'old days' of Bridge & Camera RAW. I used to cringe every time you talked about your old work flow, knowing how much extra work you were doing. Great post by the way, which highlights many of the best new features as well as some that have been in LR for quite some time, such as spot healing.
Great write up on the new features. I’ve been a staunch user of Lightroom to this point and will be making the upgrade shortly. I am excited for the localized enhancement tools.
Note that the healing brush has been in earlier releases but is still a great feature to highlight.
Just would like to give Aperture fans here a moment as well. =)
I have replied to most of the features described here on my blog in a “comment-post” in why I find most of these features not news for Aperture users.
http://phatphotographer.com/?p=120
Great post Thomas!
I love the new 2.0 version too. My only complaint is that depending on Lightroom makes me really feel the need to upgrade my computer from a late edition Power PC Mac to a Macintel. It just runs so slow on my G5 dual 2.7 tower. It screams on my daughter’s intel imac though.
Hmmm – Selective editing – Come on Apple/Aperture, I want/need. It’s the only thing I go to Photoshop for.
Great write up. My upgrade is already ordered!
Here’s another time saving tip I rarely see to do with keywords.
You can create keyword hierarchies within Lightroom and it can be configured so that tagging something with a keyword from the lower level automatically assigns the higher keywords when exported.
For example, using geography, I could create a hierarchy of city, county, country, continent. Then, say I tagged something “Leeds”, Lightroom would automatically add “West Yorkshire”, “UK” and “Europe”. A great time saver!
Jeff said: “Going from a 32 to a 64 bit application will have little or no impact on the speed of the application. It only allows the application to address more memory. Going to an application that can use multiple processors would show a significant speed improvement. I do not believe Lightroom was written to support multi processors.”
1. Lightroom *was* written to handle multiple processors (and cores); Adobe has told me it can use up to eight cores (two quad-core processors, for example).
2. Differences in software design can mean processes can run faster on 64-bit x86 chips from Intel and AMD. However, Adobe told me that aspect of performance doesn’t improve on the 64-bit vesrion.
3. However, being able to address more than 4GB of memory means more photos can be cached, so moving among images is faster. And handling large panoramas also will benefit, Adobe said.
My coverage of the launch:
http://news.cnet.com/8301-13580_3-10001110-39.html
I don’t want to hop into a slow boil holy war, I like light room a lot and look forward to trying 2, but aperture pretty much dose all this and some things better (book printing, arguable more intuitive straightening tool etc).
One Aperture thing that drives me crazy that light rooms gets right though is keeps your tools expanded when you move pictures (apertures closes sharpener and others unless you use the arrow keys, never got that).
For half the price Aperture 2 is worth spending some quality time with IMO.
He, he, he…
I see nothing new here. Oh wait, I use Apple Aperture. Huh, the great and might Adobe is only now catching up to Apple. Cool.
OK, just poking a little fun. It is interesting to see how much the internets is abuzz with Lightroom news today.
Is there a way to undo motion blur? I saw this as a feature in a program from the early 1990’s but haven’t seen it since.
Good write up Thomas.
The only thing that sucks about lightroom is the price…$99 or �81 for us Brits… Why do software vendors feel the need to charge almost twice as much for the same thing in the UK????
Great post! But damn you, I just might have to go buy it today, heheh.
Not sure what to think about this little switcheroo you’re pullin’. I’m game for a try with another editing software.
Can’t believe you’re so gung ho. You were DieHardCS3, man. Just crazy talk.
-fireinthesky
Huge thing when comparing Aperture vs. Lightroom 2 is that Lightroom allows you to do localized adjustments on virtual copies of images. This is huge. In Aperture, everytime you edit with the Dodge and Burn tool, it creates a new TIFF file.
I think this is where Aperture needs to step up.
I can’t tell you how much I enjoy the new slideshow features. I often work on the fly and the efficiency combined with professionalism is a must.
great article! These new features are very helpful when you process digital images.
I will try the trial download. After i try it, I will decide if I will buy it.
thanks for sharing!